
The Easy Steps of Seed Germination: Your Seed Starting 101 Guide
There’s nothing to be afraid of if you follow our simple seed starting 101 guide. Many gardeners shy away when the conversation turns to seed trays and heating mats, saying things like, “I just buy organic seedlings from my local nursery.” That’s one way to go, but if you want to get the most out of your gardening dollar, learning how do you germinate seeds yourself is unbeatable. Plus, it allows you to choose exactly the vegetable variety or much-loved flower you want.
In our video, Seed Starting 101, Tricia walks you through the entire seed-starting process and explains the different equipment options. By understanding the steps of seed germination, you’ll be able to make important decisions on when to start your seeds, what to plant them in, and how to create the best environmental conditions for successful germination.
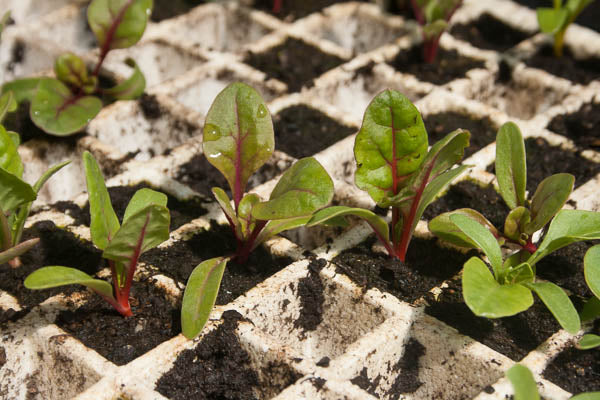
Chard starts in a Speedling tray are almost ready to be transplanted out.
Timing your seed starts
If you already have your seeds in hand, check your seed packet for germination times and read the instructions on when the plant should be transplanted. For example, squash is sensitive to getting root-bound so it should be started 3-4 weeks before the last frost in a larger container. Tomatoes and peppers need longer times and are typically started 6-8 weeks before the last frost. If you're doing cool weather veggies, some of them, like broccoli and cauliflower, should be set out BEFORE the last frost. Still making up your mind? The date of the last frost in your area is crucial. Planting your seedlings outdoors before the last frost typically leads to heartbreak when the seedlings are zapped by a cold snap. So please, don't try to jump the gun on that outdoor planting date. Count back from the last frost date to calculate when to start your seeds. Or we have made it really easy if you use our Seed Planting Calculator. There is a link to find your first and last frost dates based on the state and county. Once you know that date, simply put it in the calculator and it will give you approximated dates to either plant seeds indoors or when to direct seed outdoors.

This tomato in a Cow Pot is ready to be transplanted out into the garden.
How to choose a seed starting container
Seeds can be started in just about anything, including eggshells and paper milk cartons.
Some of our favorite re-usable trays are:
Hortiblock Transplant Trays have their own insulation and are designed to air-prune the roots. These trays are favorites with farmers because they last for years. I've seen ten-year-old Hortiblock Transplant trays still in service and looking great. Standard plastic trays are easy to work with and very durable.
The bio-degradable route is a great option for sustainability:
To minimize transplant shock, try Soil Blockers This innovative method doesn't use a container at all, just a compressed block of media. Roots are air-pruned and the block is dropped right in the ground. For more info on this method check out our video. CowPots that are made from manure and can go straight into your garden soil. Their cousins coco peat pellets, and coco fiber pots are some other marvelous options. Fill your containers with a soilless mix, like our organic QuickRoot, place your seeds two to a cell (Tricia likes to use the Widger as a seed spoon), and water well with a fine spray. The Dramm watering can has a removable "rose" on the spout that will sprinkle your seeds and seedlings with droplets. Make sure your seeds and seedlings get a continuous supply of water. If they dry out during germination they will die.

This lettuce is in a soil block.
Do you need an additional heating source for your seedlings?
Using Speedling trays, with their built-in insulation, means you don't need a heating mat but can simply put the trays in a warm place (like the top of the refrigerator). Heating mats will help with all other containers -- including soil blocks, which are set onto undivided trays. If you're new to seed starting and want a growing kit that contains everything you need, try our Peaceful Valley Seed Starting Kit. Most plants germinate best in a temperature range of 65°F to 75°F. During cool weather that means a heating mat will be required.
Conclusion:
Starting seeds doesn’t have to be intimidating—by following the steps of seed germination and using the proper tools, you’ll set yourself up for success. If you’re wondering how do you germinate seeds effectively, understanding the right environmental conditions is key. Seeds need water, oxygen, and the proper temperature to activate their growth and begin to sprout. With the right care, you’ll see healthy seedlings develop, with roots anchoring the plant and shoots reaching toward the soil surface. Our seed starting 101 guide emphasizes patience and attention to detail, helping you grow vibrant plants right from the start!
For all your seed starting needs, check out our full range of supplies here: Seed Starting Supplies.
Feeling more confident? Don't let seed starting scare you this year!
FAQ About Seed Germination 101
What is the process of seed germination?
How do environmental factors affect seed germination?
What happens after the seed coat breaks open?
Do seeds need water and oxygen to germinate?
What is epigeal germination?
What role do food reserves play in seed germination?
What do seeds require to break dormancy?
Resource Area: From Calculation to Care
Take next steps beyond sowing—care, transplant readiness, and hardening off seedlings:
- Seed Starting 201: Seedling Care & Hardening Off – Learn the full care cycle post calculation-based planting.
- How to Use the Seed Starting Calculator – Ensures seedlings are ready on time for transplanting success.


2 comments
Ellen, you should move up into a larger pot with soil, either native soil or potting soil. You should not let your seedlings get root bound. Keep them in a warm place with lots of sun until you are ready to set them out into the garden.
If my soilless seedlings are getting pot bound before the outside temp is warm enough to plant, shall I transplant them to larger pots with soil?